Android View 的绘制流程解析
本文略讲了 Android View 的绘制流程。
View 的绘制流程分为三步:measure(测量)、layout(布局)、draw(绘制)
measure是确定view的大小,layout是计算在界面中显示的位置,draw便是最后的绘制步骤了。三者是先后执行的。
大致流程如下:
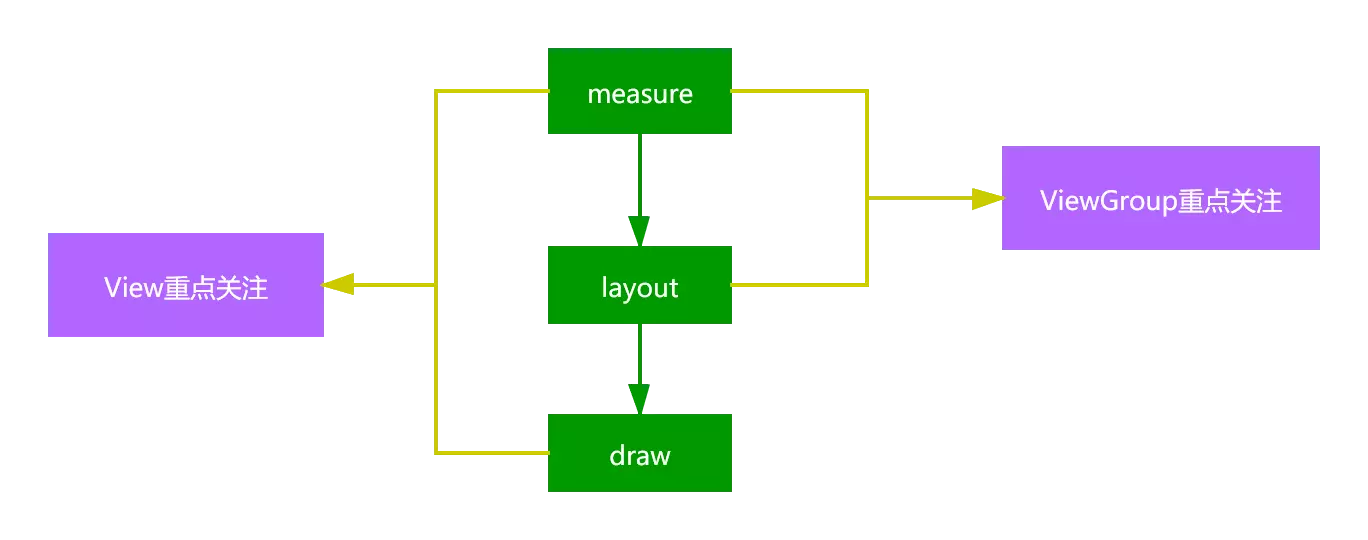
自定义 View 的第一步,肯定是明确的宽高,位置坐标,宽高是在测量阶段得出。然后在布局阶段,确定好位置信息,对矩形布局,之后的视觉效果就交给绘制流程了。
流程是很简单的,但是实际的操作却是很复杂的。
布局涉及两个过程:测量过程和布局过程。测量过程通过 measure 方法实现,是 View 树自顶向下的遍历,每个 View 在循环过程中将尺寸细节往下传递,当测量过程完成之后,所有的 View 都存储了自己的尺寸。第二个过程则是通过方法 layout 来实现的,也是自顶向下的。在这个过程中,每个父 View 负责通过计算好的尺寸放置它的子 View。
MeasureSpec
测量过程中,有一个很重要的类:MeasureSpec。MeasureSpec 是 View 中一个静态类,代表测量规则,而它的手段则是用一个 int 数值来实现。我们知道一个 int 数值有 32 bit。MeasureSpec 将它的高 2 位用来代表测量模式 Mode,低 30 位用来代表数值大小 Size。
测量的尺寸好理解。说明下测量模式,测量模式可以取三个值,其含义如下:
View测量模式说明](/imgs/View测量模式说明.webp)
子 View 在 xml 中的布局参数,对应的测量模式如下:
- wrap_content —> MeasureSpec.AT_MOST
- match_parent -> MeasureSpec.EXACTLY
- 具体值 -> MeasureSpec.EXACTLY
对于 UNSPECIFIED 模式,一般的 View 不会用上,在滚动组件或者列表中可能会用上。而这部分属于比较深入的内容了,此处我们不细讲。
MeasureSpec 的源码如下:
/**
  * MeasureSpec类的源码分析
  **/
public class MeasureSpec {
      // 进位大小 = 2的30次方
      // int的大小为32位,所以进位30位 = 使用int的32和31位做标志位
      private static final int MODE_SHIFT = 30;
      // 运算遮罩:0x3为16进制,10进制为3,二进制为11
      // 3向左进位30 = 11 00000000000(11后跟30个0)
      // 作用:用1标注需要的值,0标注不要的值。因1与任何数做与运算都得任何数、0与任何数做与运算都得0
      private static final int MODE_MASK  = 0x3 << MODE_SHIFT;
      // UNSPECIFIED的模式设置:0向左进位30 = 00后跟30个0,即00 00000000000
      public static final int UNSPECIFIED = 0 << MODE_SHIFT;
      // EXACTLY的模式设置:1向左进位30 = 01后跟30个0 ,即01 00000000000
      public static final int EXACTLY = 1 << MODE_SHIFT;
      // AT_MOST的模式设置:2向左进位30 = 10后跟30个0,即10 00000000000
      public static final int AT_MOST = 2 << MODE_SHIFT;

      /**
        * makeMeasureSpec()方法
        * 作用:根据提供的size和mode得到一个详细的测量结果吗,即measureSpec
        **/
      public static int makeMeasureSpec(int size, int mode) {
            // 设计目的:使用一个32位的二进制数,其中:第32和第31位代表测量模式(mode)、后30位代表测量大小(size)
            // ~ 表示按位取反
            return (size & ~MODE_MASK) | (mode & MODE_MASK);
      }

      /**
        * getMode()方法
        * 作用:通过measureSpec获得测量模式(mode)
        **/
      public static int getMode(int measureSpec) {
          return (measureSpec & MODE_MASK);
          // 即:测量模式(mode) = measureSpec & MODE_MASK;
          // MODE_MASK = 运算遮罩 = 11 00000000000(11后跟30个0)
          //原理:保留measureSpec的高2位(即测量模式)、使用0替换后30位
          // 例如10 00..00100 & 11 00..00(11后跟30个0) = 10 00..00(AT_MOST),这样就得到了mode的值
      }
      /**
        * getSize方法
        * 作用:通过measureSpec获得测量大小size
        **/
      public static int getSize(int measureSpec) {
          return (measureSpec & ~MODE_MASK);
          // size = measureSpec & ~MODE_MASK;
          // 原理类似上面,即 将MODE_MASK取反,也就是变成了00 111111(00后跟30个1),将32,31替换成0也就是去掉mode,保留后30位的size
      }
}
MeasureSpec 值是如何计算得来? 其实,子 View 的 MeasureSpec 值根据子 View 的布局参数(LayoutParams)和父容器的 MeasureSpec 值计算得来的,具体计算逻辑封装在 ViewGroup 的 getChildMeasureSpec() 里。即子 view 的大小由父 view 的 MeasureSpec 值 和 子 view 自身的 LayoutParams 属性共同决定。
下面,我们来看 getChildMeasureSpec() 的源码分析:
/**
  * 方法所在类:ViewGroup
  * 参数说明
  *
  * @param spec 父 view 的详细测量值(MeasureSpec)
  * @param padding view 当前尺寸的的内边距
  * @param childDimension 子视图的尺寸(宽/高),如果子 View 未测量完成,则该值为子 View 的布局参数。测量完成则是子 View 的尺寸
  */
public static int getChildMeasureSpec(int spec, int padding, int childDimension) {
      //父view的测量模式
      int specMode = MeasureSpec.getMode(spec);
      //父view的大小
      int specSize = MeasureSpec.getSize(spec);
      //通过父view计算出的子view = 父大小-边距(父要求的大小,但子view不一定用这个值)
      int size = Math.max(0, specSize - padding);

      //子view想要的实际大小和模式(需要计算)
      int resultSize = 0;
      int resultMode = 0;

      // 当父 View 的模式为 EXACITY 时,父 View 强加给子 View 确切的值
      //一般是父 View 设置为 match_parent 或者固定值的 ViewGroup
      switch (specMode) {
            case MeasureSpec.EXACTLY:
                  // 当子 View 测量完成,即有确切的值
                  // 子 View 大小为子自身所赋的值,模式大小为 EXACTLY
                  if (childDimension >= 0) {
                        resultSize = childDimension;
                        resultMode = MeasureSpec.EXACTLY;
                  } else if (childDimension == LayoutParams.MATCH_PARENT) {
                        // 测量未完成
                        // 当子 View 的 LayoutParams 为 MATCH_PARENT 时(-1)
                        //子 view 大小为父 view 大小,模式为 EXACTLY
                        resultSize = size;
                        resultMode = MeasureSpec.EXACTLY;
                  } else if (childDimension == LayoutParams.WRAP_CONTENT) {
                        // 测量未完成
                        // 当子view的LayoutParams为WRAP_CONTENT时(-2)
                        // 子 view 决定自己的大小,但最大不能超过父 view,模式为 AT_MOST
                        resultSize = size;
                        resultMode = MeasureSpec.AT_MOST;
                  }
                  break;
            case MeasureSpec.AT_MOST:
                  // 当父 View 的模式为 AT_MOST 时,父 view 强加给子 View 一个最大的值。(一般是父 view 设置为 wrap_content)
                  // 代码含义同上
                  if (childDimension >= 0) {
                      resultSize = childDimension;
                      resultMode = MeasureSpec.EXACTLY;
                  } else if (childDimension == LayoutParams.MATCH_PARENT) {
                      resultSize = size;
                      resultMode = MeasureSpec.AT_MOST;
                  } else if (childDimension == LayoutParams.WRAP_CONTENT) {
                      resultSize = size;
                      resultMode = MeasureSpec.AT_MOST;
                  }
                  break;
            case MeasureSpec.UNSPECIFIED:
                  // 当父 View 的模式为 UNSPECIFIED 时,父容器不对 View 有任何限制,要多大给多大
                  // 多见于 ListView、GridView
                  if (childDimension >= 0) {
                      // 子 view 大小为子自身所赋的值
                      resultSize = childDimension;
                      resultMode = MeasureSpec.EXACTLY;
                  } else if (childDimension == LayoutParams.MATCH_PARENT) {
                      // 因为父 View 为 UNSPECIFIED,API 大于23时,可以传递 hint 值用于测量,详见 View.sUseZeroUnspecifiedMeasureSpec 的赋值处。通常 resultSize 为 0
                      resultSize = View.sUseZeroUnspecifiedMeasureSpec ? 0 : size;
                      resultMode = MeasureSpec.UNSPECIFIED;
                  } else if (childDimension == LayoutParams.WRAP_CONTENT) {
                      // 说明同上
                      resultSize = View.sUseZeroUnspecifiedMeasureSpec ? 0 : size;
                      resultMode = MeasureSpec.UNSPECIFIED;
                  }
                  break;
      }
      return MeasureSpec.makeMeasureSpec(resultSize, resultMode);
}
上述流程很简单,可以用下面的流程图概括:
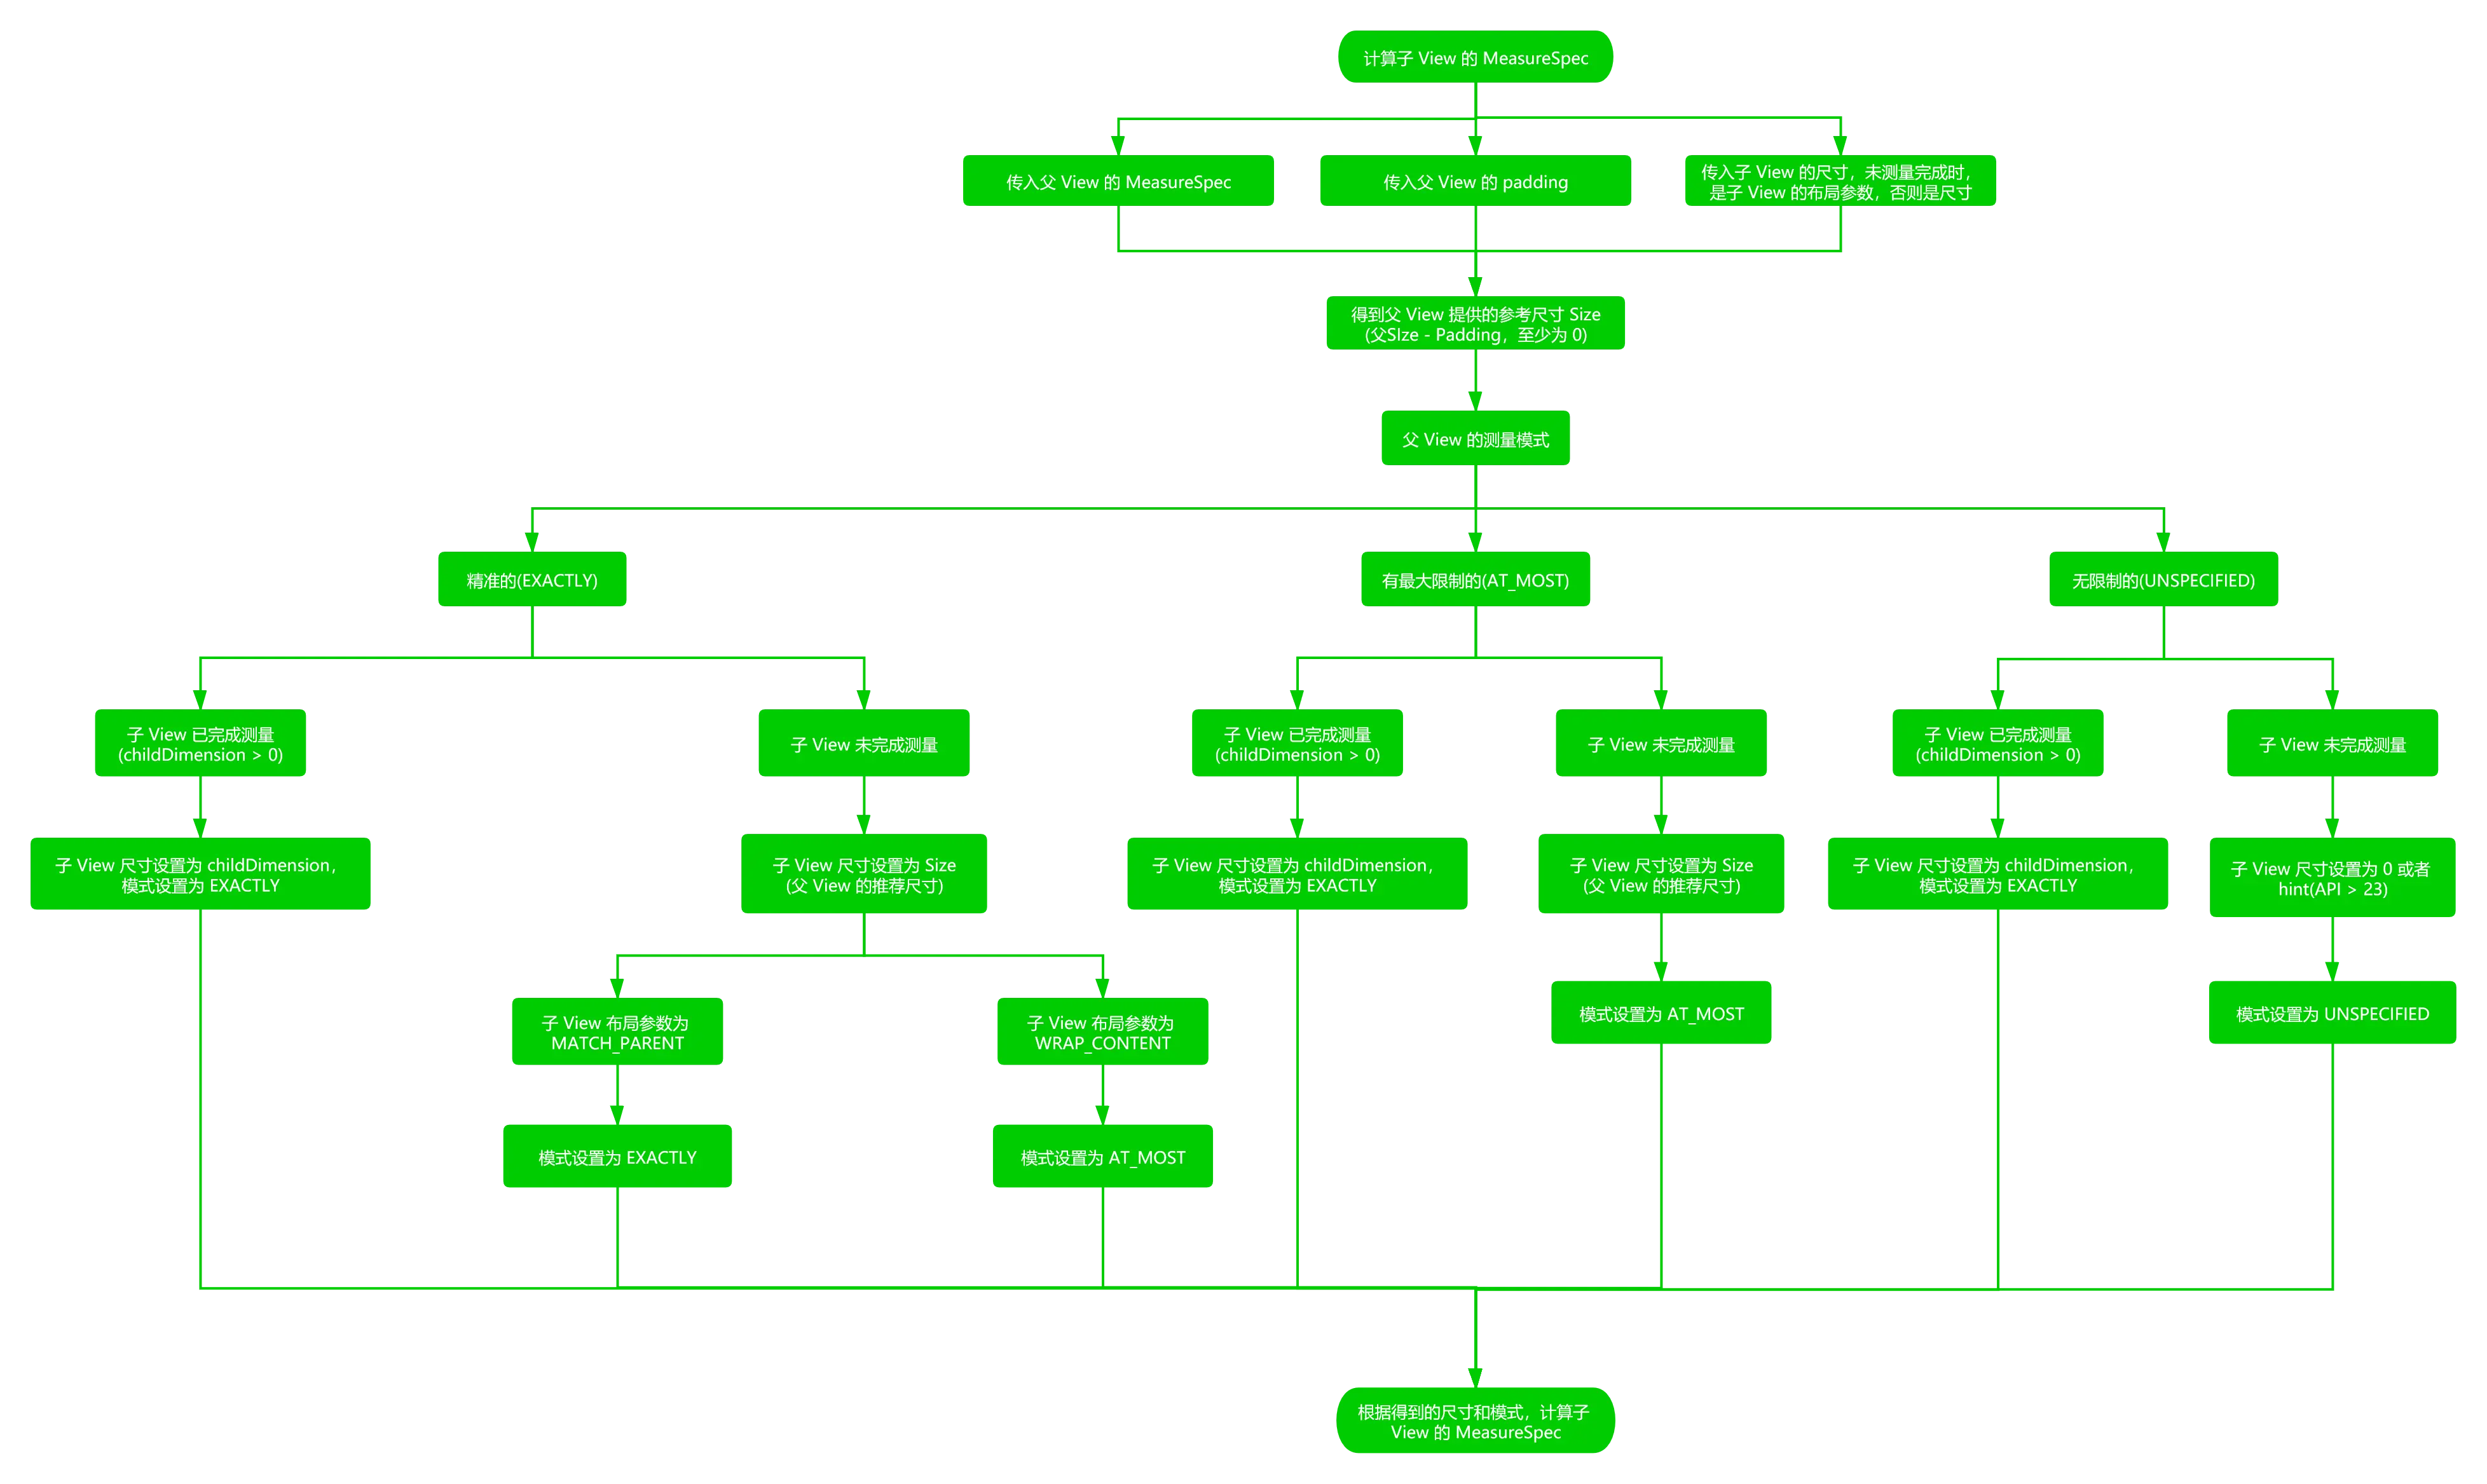
得到了 MeasureSpec,我们就可以讲讲绘制流程了。不过不同的组件绘制方式不同,View 和 ViewGroup 的绘制流程又不同,下面我们会挑几个特例,讲讲 View 的 measure 和 ViewGroup 的 layout 过程。
View 的绘制流程
View 的绘制流程比较简单,我们先了解。通常在实现自定义 View 时,我们会终点关注 measure 和 draw 过程,draw 过程比较复杂,暂时不涉及。
measure
我们自定义一个 View,关键方法是 measure,但 measure 方法是 final 的,我们不能继承更改,但 measure 中使用了一个 onMeasure() 方法。onMeasure() 是一个关键方法,也是本文重点研究内容,是官方暴露出来给我们使用的。该方法会测量 View 自己的大小,为正式布局提供建议。(注意,只是建议,至于用不用,要看onLayout)。
View 的 onMeasure 方法是默认实现,此处跳过。下面我们重点说明一下 ImageView 的测量流程,明白了 ImageView 的测量过程,也就明白了如何通过测量模式得到最终尺寸,也就明白了测量模式是怎么一回事。首先我们明确一个方法:setMeasuredDimension。使用该方法可以存储测量出来的大小结果。
ImageView.onMeasure
代码可以可能有点长,可以看看注释:
@Override
protected void onMeasure(int widthMeasureSpec, int heightMeasureSpec) {
    // 解析为 ImageView 自动的 uri,并更新用于显示的 Drawable
    resolveUri();
    // View 测量的宽高
    int w;
    int h;

    // View 显示的内容的比例(不包括 padding)
    float desiredAspect = 0.0f;
    // 是否允许改变 View 的宽高
    boolean resizeWidth = false;
    boolean resizeHeight = false;
    // 布局模式
    final int widthSpecMode = MeasureSpec.getMode(widthMeasureSpec);
    final int heightSpecMode = MeasureSpec.getMode(heightMeasureSpec);

    if (mDrawable == null) {
        // 没有可显示的 Drawable,Drawable 的宽高设置为 -1,View 的宽高设置为 0
        mDrawableWidth = -1;
        mDrawableHeight = -1;
        w = h = 0;
    } else {
        // 有可显示的 Drawable,View 的宽高设置为 Drawable 的宽高
        w = mDrawableWidth;
        h = mDrawableHeight;
        // 宽高进行过滤操作,最小为 1(防止 Drawable 异常)
        if (w <= 0) w = 1;
        if (h <= 0) h = 1;

        // 是否需要根据 Drawable 的宽高比例更改 View 的范围
        if (mAdjustViewBounds) {
            // View 的宽高的布局模式不为精准模式时,才能更改
            resizeWidth = widthSpecMode != MeasureSpec.EXACTLY;
            resizeHeight = heightSpecMode != MeasureSpec.EXACTLY;

            desiredAspect = (float) w / (float) h;
        }
    }
    // 上下左右的 padding
    final int pleft = mPaddingLeft;
    final int pright = mPaddingRight;
    final int ptop = mPaddingTop;
    final int pbottom = mPaddingBottom;

    int widthSize;
    int heightSize;

    if (resizeWidth || resizeHeight) {
        // View 的宽高需要二次更改

        // 首次测量,会根据最大尺寸获取目标尺寸
        widthSize = resolveAdjustedSize(w + pleft + pright, mMaxWidth, widthMeasureSpec);
        heightSize = resolveAdjustedSize(h + ptop + pbottom, mMaxHeight, heightMeasureSpec);
        // 比例不为 0 才二次测量,避免异常情况
        if (desiredAspect != 0.0f) {
            // 图片实际的调整比例
            final float actualAspect = (float)(widthSize - pleft - pright) /
                (heightSize - ptop - pbottom);
            // 实际的宽高比例和预期的宽高比例不等,需要重新调整尺寸
            // 注意 float 的不等于的比较方式,!= 并不一定准确
            if (Math.abs(actualAspect - desiredAspect) > 0.0000001) {
                boolean done = false;
                // 需要调整宽度
                if (resizeWidth) {
                    int newWidth = (int)(desiredAspect * (heightSize - ptop - pbottom)) +
                        pleft + pright;

                    // 此代码 API 大于 17 时生效,否则不生效
                    if (!resizeHeight && !sCompatAdjustViewBounds) {
                        widthSize = resolveAdjustedSize(newWidth, mMaxWidth, widthMeasureSpec);
                    }
                    // 新的尺寸小于等于原尺寸,才重新赋值。因为 width 前一次测量已经得到了最大的可能宽度
                    if (newWidth <= widthSize) {
                        widthSize = newWidth;
                        // 宽度按照 desiredAspect 比例改过,此时view是符合 desiredAspect 的。
                        done = true;
                    }
                }

                // 需要调整高度,宽度按照比例该过后,就不再更改了。=
                if (!done && resizeHeight) {
                    int newHeight = (int)((widthSize - pleft - pright) / desiredAspect) +
                        ptop + pbottom;

                    // 说明同上
                    if (!resizeWidth && !sCompatAdjustViewBounds) {
                        heightSize = resolveAdjustedSize(newHeight, mMaxHeight, heightMeasureSpec);
                    }

                    if (newHeight <= heightSize) {
                        heightSize = newHeight;
                    }
                }
            }
        }
    } else {
        // View 的宽高不能更改,走正常的测量流程

        // View 的宽高加上 padding
        w += pleft + pright;
        h += ptop + pbottom;
        // 测量出来的宽高不能小于设置的 View 的最小值
        // 该最小宽度由 minWidth(minHeight) 和背景 Drawable 决定
        w = Math.max(w, getSuggestedMinimumWidth());
        h = Math.max(h, getSuggestedMinimumHeight());
        // 根据结果,获取最终的值
        widthSize = resolveSizeAndState(w, widthMeasureSpec, 0);
        heightSize = resolveSizeAndState(h, heightMeasureSpec, 0);
    }
    // 保存存储的结果
    setMeasuredDimension(widthSize, heightSize);
}
上面 ImageView 的测量流程其实很简单,可以用下面的流程图描述:
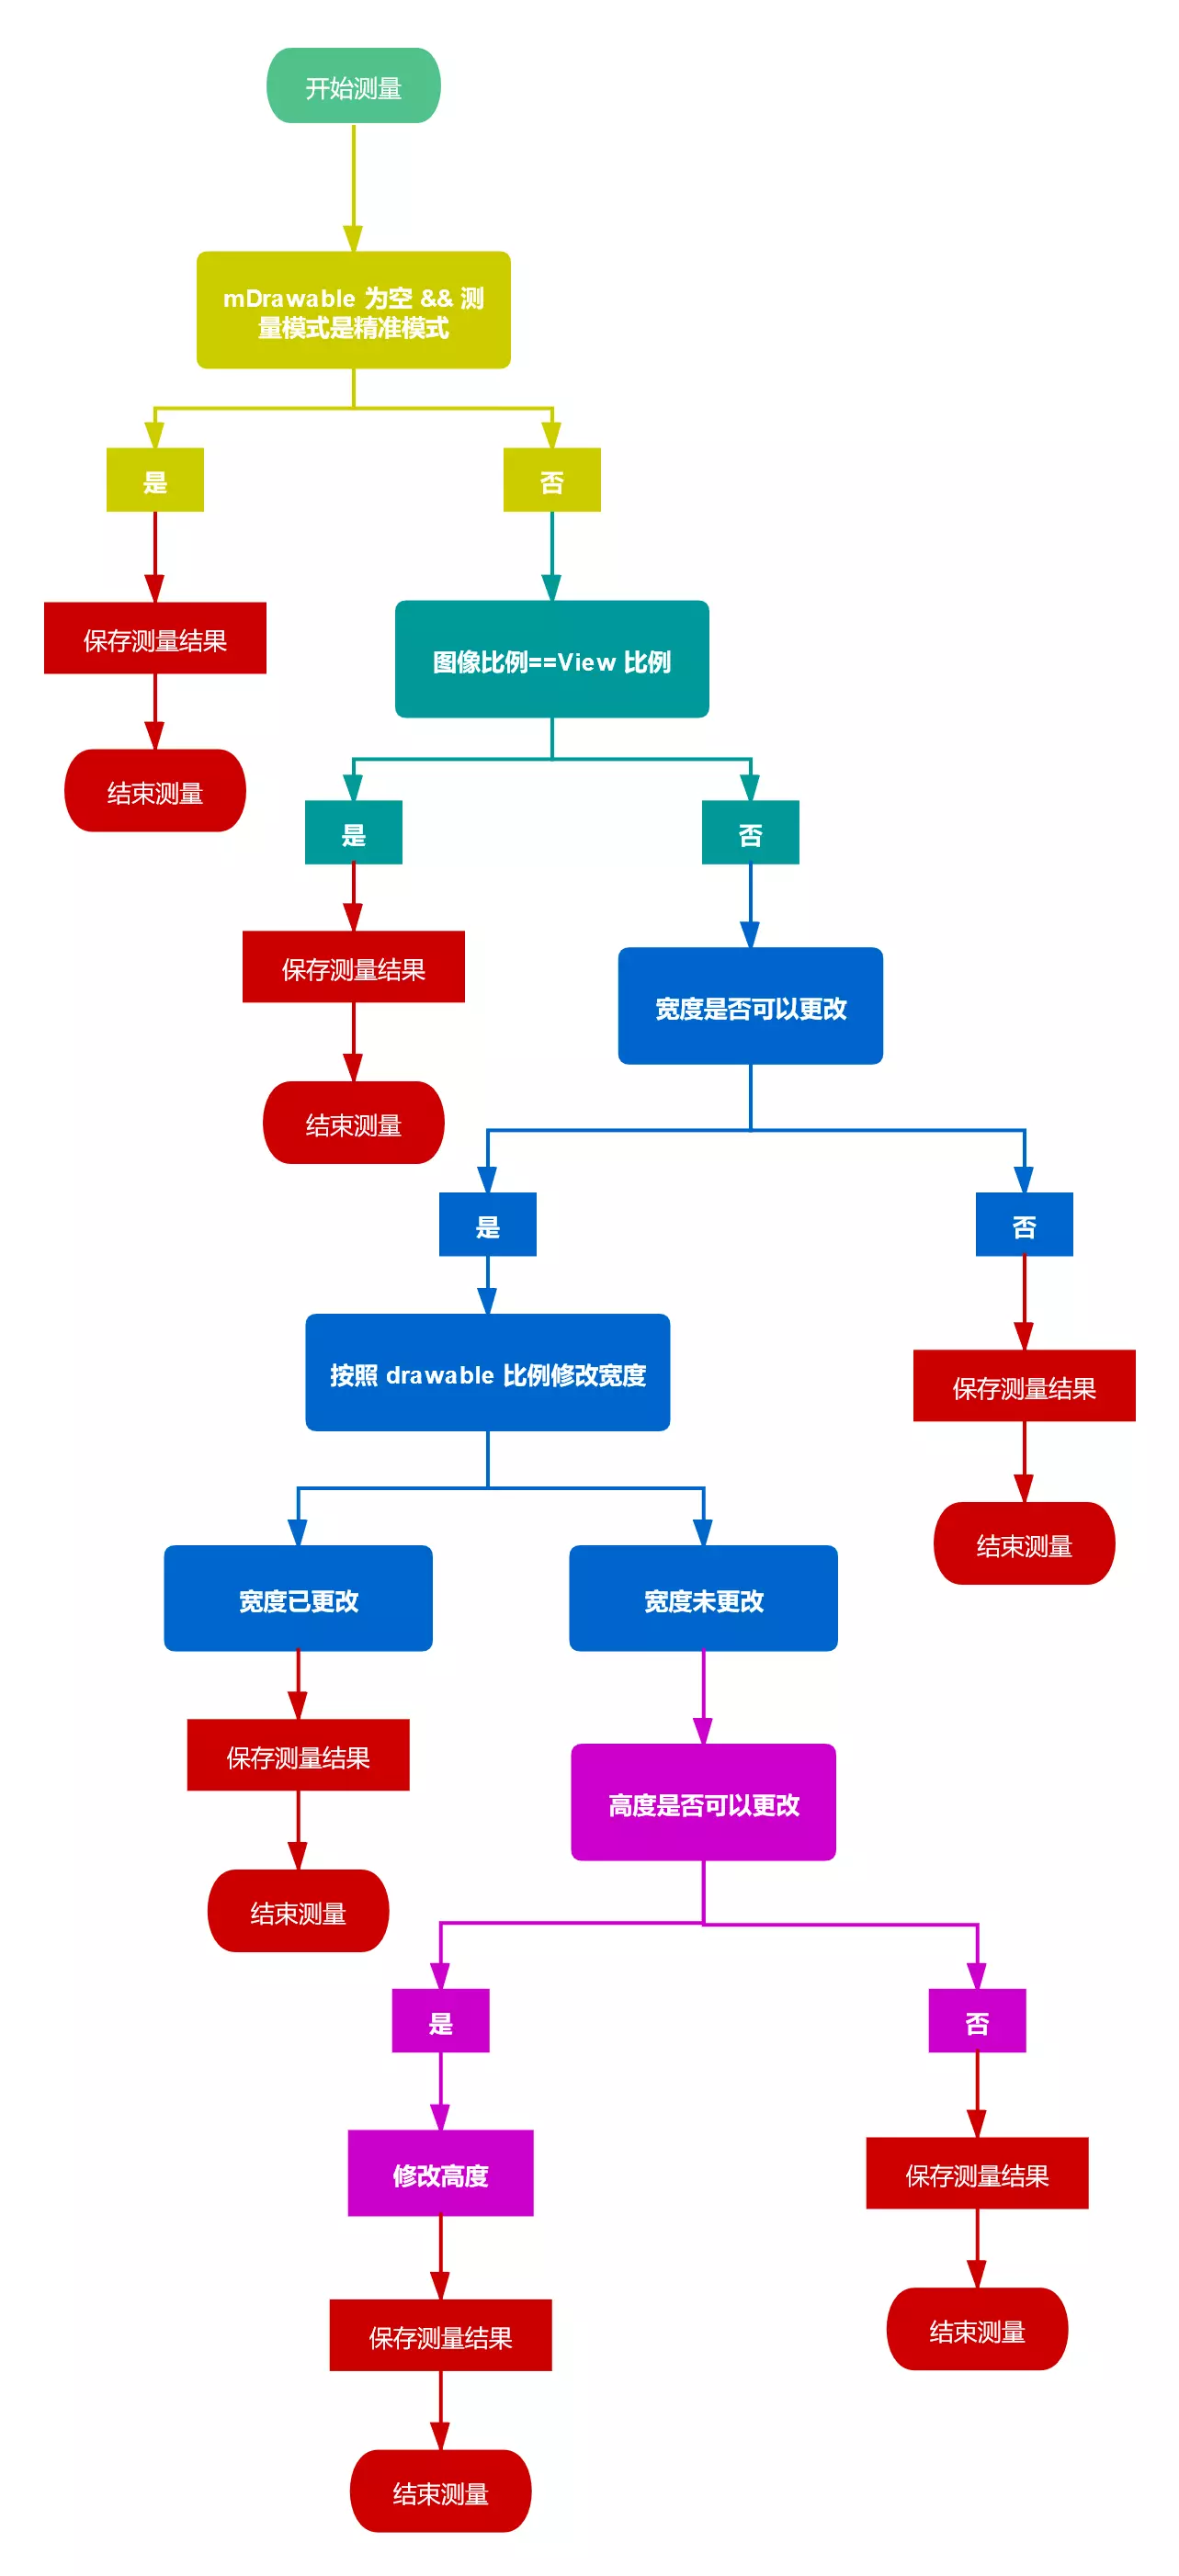
其实,上面的测量逻辑,还是很简单的。并不复杂,主要是赋值过程的计算,是在当前的测量结果和限定值之间的取舍(自身设置的最大/最小值,父类给予的限定值)。而赋值过程的重点其实在 resolveAdjustedSize 这个方法。从代码中的使用可以看出来,ImageView的宽高是在 测量值/自身最大值/父类限定值 三者间得出的。
// 值通过测量值(带上padding)/自身设置的最大值/父类的布局要求,三者计算
widthSize = resolveAdjustedSize(w + pleft + pright, mMaxWidth, widthMeasureSpec);
heightSize = resolveAdjustedSize(h + ptop + pbottom, mMaxHeight, heightMeasureSpec);
下面我们来看看这个方法的具体实现,注意:可以看看这个方法的源码,官方给出的注释说明是 measure 过程的核心思想的体现。
/**
 * 解析得到最终的结果
 *
 * @param desiredSize ImageView 自身测量出的尺寸
 * @param maxSize     ImageView 布局参数传入的最大尺寸
 * @param measureSpec 父布局对 ImageView 的测量要求
 */
private int resolveAdjustedSize(int desiredSize, int maxSize, int measureSpec) {
    int result = desiredSize;
    final int specMode = MeasureSpec.getMode(measureSpec);
    // 父 View  对子 View 的尺寸限制
    final int specSize =  MeasureSpec.getSize(measureSpec);
    switch (specMode) {
        case MeasureSpec.UNSPECIFIED:
            // 父布局对测量无限制,则用自身测量的尺寸,但不应该超过最大值
            result = Math.min(desiredSize, maxSize);
            break;
        case MeasureSpec.AT_MOST:
            // 父布局对测量规定了最大值,测量的结果可以尽可能的大,但是不能超过 specSize,
            // 也不能超过自身规定的最大尺寸 maxSize。则在三者中取最小值
            result = Math.min(Math.min(desiredSize, specSize), maxSize);
            break;
        case MeasureSpec.EXACTLY:
            // 父布局对测量要求是精确的,没得选,只能使用父布局传入的值
            result = specSize;
            break;
    }
    return result;
}
讲解了 ImageView 的 measure 过程,我们来看看 View Group 的布局过程。ViewGroup 的绘制和布局过程主要是对子 View 操作。可以理解成它并不太会关注自己的事,因为它是它父 View 的子 View,他的测量是在其父 View 中调用的,当然,会有一个根布局。这就是一个递归调用的过程。
按照流程,我们知道 View 的布局,最终会走到 onLayout 方法,此处就以 FrameLayout 为例,讲解下布局操作。
FrameLayout.onLayout
按照惯例,先上源码,再上图。FrameLayout.onLayout 的主要代码是在 layoutChildren 这个方法中,下面我们讲讲 layoutChildren 这个方法。
/**
 * 布局 FrameLayout
 *
 * @param left              当前 ViewGroup 距父布局左边界的距离
 × @param top               当前 ViewGroup 距父布局上边界的距离
 * @param right             当前 ViewGroup 距父布局有边界的距离
 × @param bottom            当前 ViewGroup 距父布局下边界的距离
 * @param forceLeftGravity  暂未用上的参数
 * */
void layoutChildren(int left, int top, int right, int bottom, boolean forceLeftGravity) {
    // 获得子 View 的数量
    final int count = getChildCount();
    // 当前布局的左侧布局起点(加上左 padding)
    final int parentLeft = getPaddingLeftWithForeground();
    // 当前布局的右侧布局终点(减去右 padding)
    final int parentRight = right - left - getPaddingRightWithForeground();
    // 当前布局的上侧布局起点(加上上 padding)
    final int parentTop = getPaddingTopWithForeground();
    // 当前布局的下侧布局终点(减去下 padding)
    final int parentBottom = bottom - top - getPaddingBottomWithForeground();

    for (int i = 0; i < count; i++) {
        final View child = getChildAt(i);
        // 子 View 不设置为 GONE,才进行布局。即 GONE 属性不占用任何空间
        if (child.getVisibility() != GONE) {
            final LayoutParams lp = (LayoutParams) child.getLayoutParams();
            // 获取测量出的尺寸,布局前已先测量
            final int width = child.getMeasuredWidth();
            final int height = child.getMeasuredHeight();

            int childLeft;
            int childTop;

            int gravity = lp.gravity;
            if (gravity == -1) {
                // 对齐方式默认是左上角
                gravity = DEFAULT_CHILD_GRAVITY;
            }
            // 获取布局方向,RTL 还是 LTR
            final int layoutDirection = getLayoutDirection();
            // 获取水平方向上的对齐方式
            final int absoluteGravity = Gravity.getAbsoluteGravity(gravity, layoutDirection);
            // 获取竖直方向上的对齐样式
            final int verticalGravity = gravity & Gravity.VERTICAL_GRAVITY_MASK;
            // 先判断水平方向上的对齐方式
            switch (absoluteGravity & Gravity.HORIZONTAL_GRAVITY_MASK) {
                    // 子 View 居中
                case Gravity.CENTER_HORIZONTAL:
                    // 参见代码下的图,有助于理解
                    // parentRight - parentLeft - width 可以简单的理解为左右 margin 和
                    childLeft = parentLeft + (parentRight - parentLeft - width) / 2 +
                        lp.leftMargin - lp.rightMargin;
                    break;
                    // 子 View 右对齐
                case Gravity.RIGHT:
                    if (!forceLeftGravity) {
                        childLeft = parentRight - width - lp.rightMargin;
                        break;
                    }
                    // 子 View 左对齐
                case Gravity.LEFT:
                default:
                    childLeft = parentLeft + lp.leftMargin;
            }
            // 再判断垂直方向上的对齐方式
            switch (verticalGravity) {
                    // 顶部对齐
                case Gravity.TOP:
                    childTop = parentTop + lp.topMargin;
                    break;
                    // 竖直居中对齐
                case Gravity.CENTER_VERTICAL:
                    childTop = parentTop + (parentBottom - parentTop - height) / 2 +
                        lp.topMargin - lp.bottomMargin;
                    break;
                    // 底部对齐
                case Gravity.BOTTOM:
                    childTop = parentBottom - height - lp.bottomMargin;
                    break;
                default:
                    childTop = parentTop + lp.topMargin;
            }
            // 计算出了子 View 的位置,布局子 View(即调用子 View 的布局方法)
            child.layout(childLeft, childTop, childLeft + width, childTop + height);
        }
    }
}
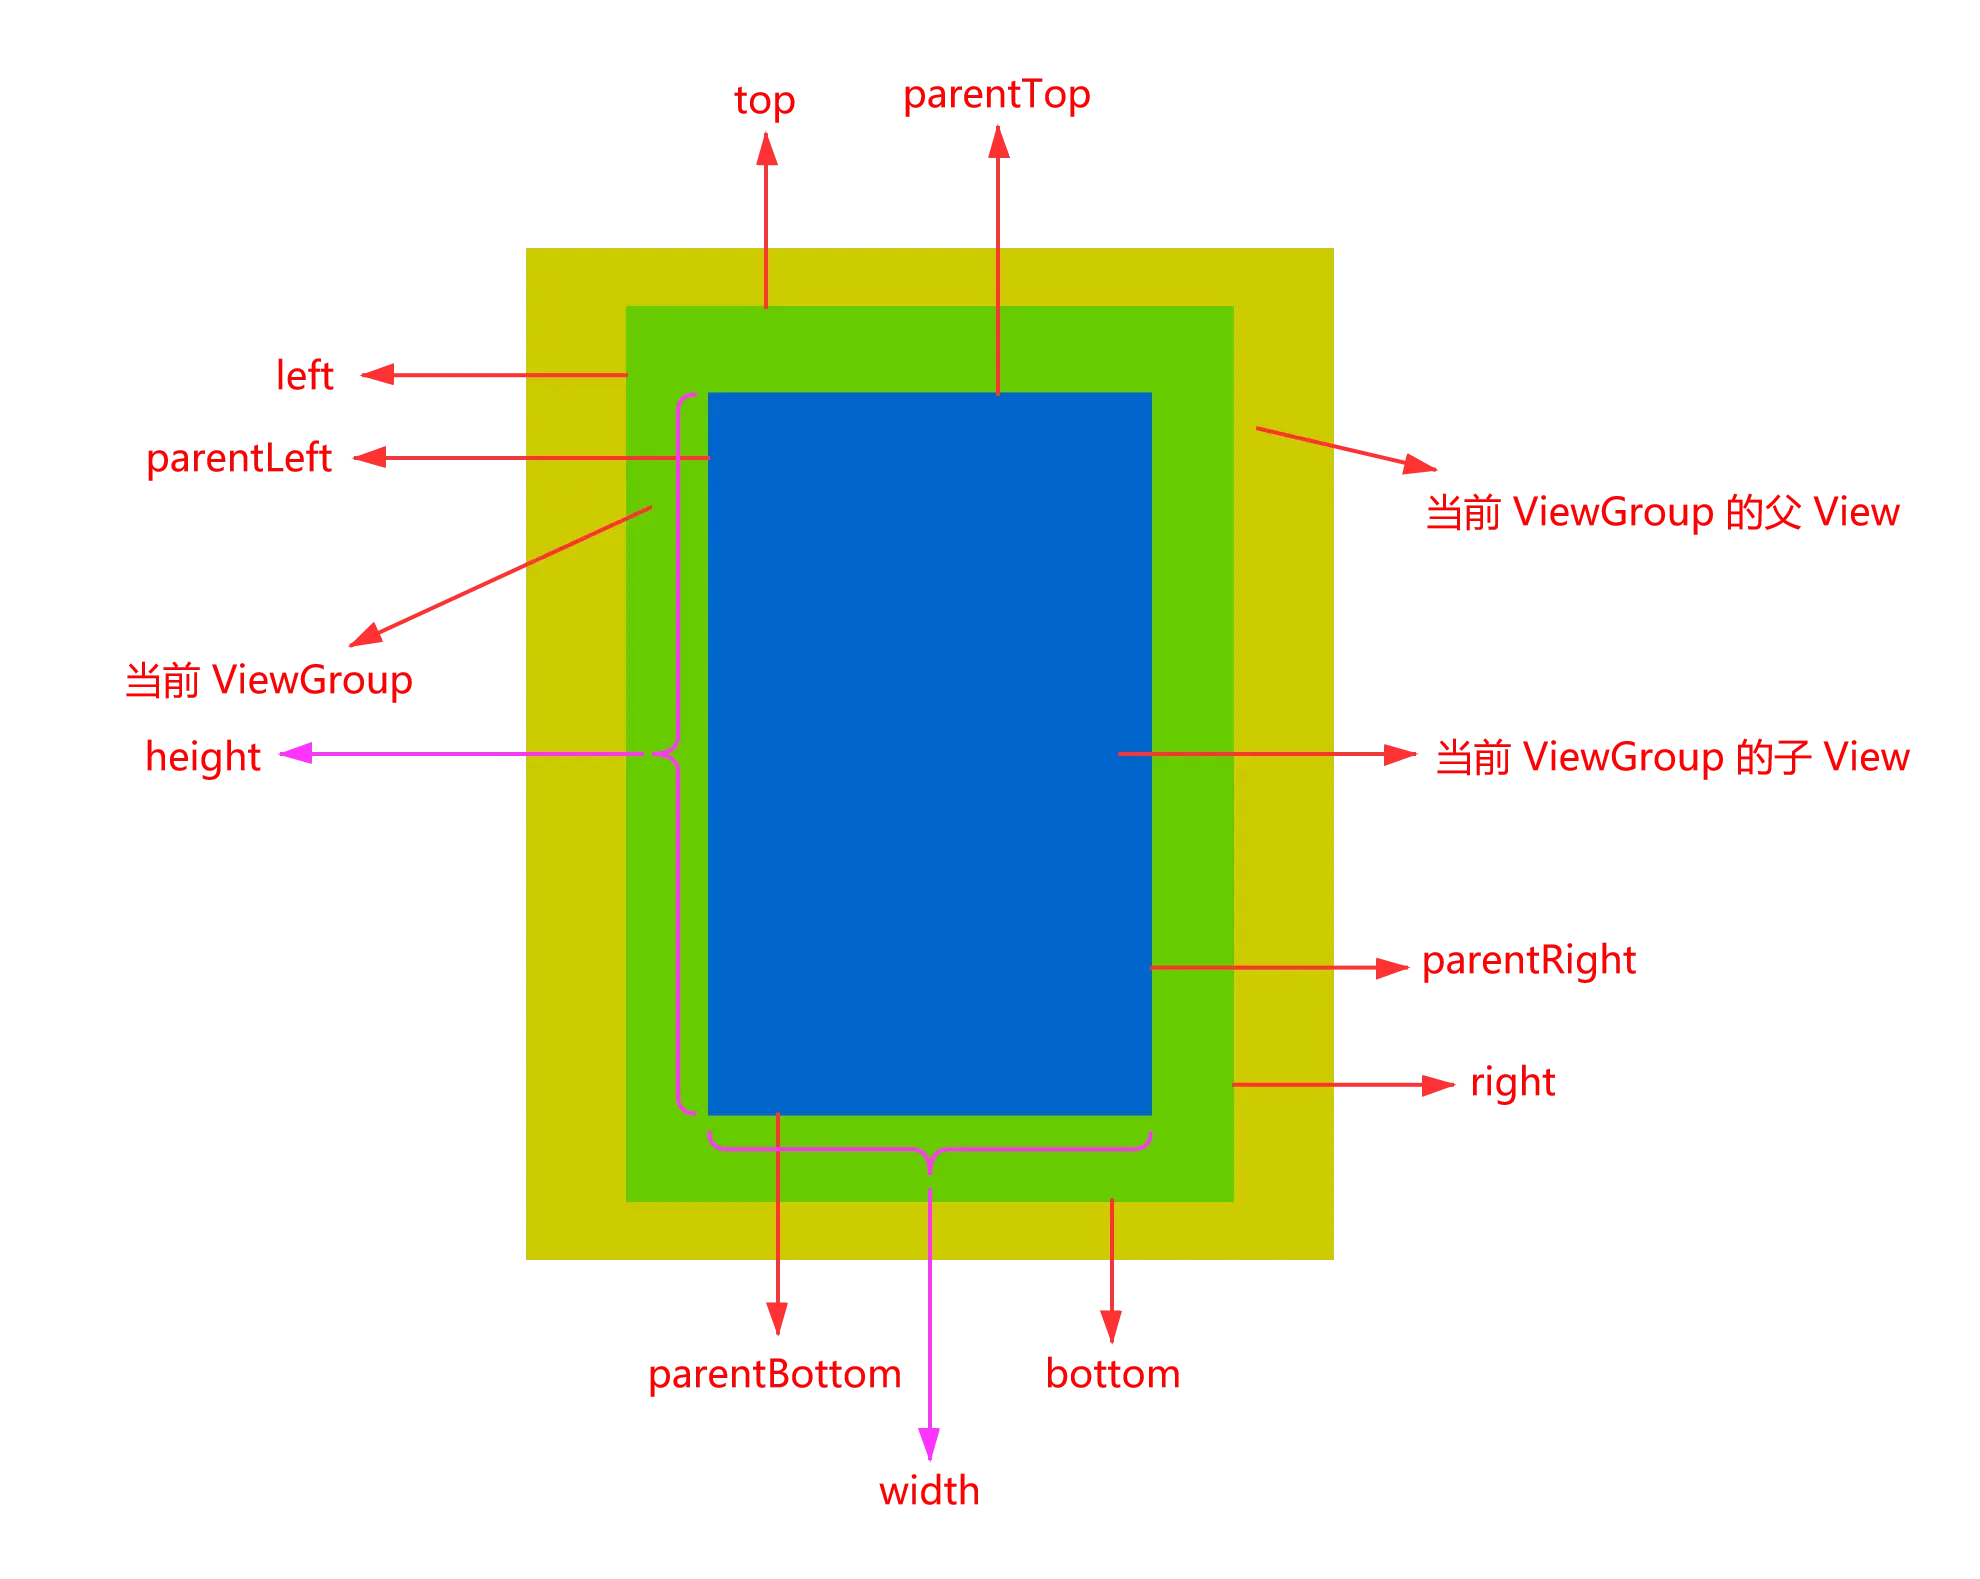
上面的代码,结合图片便能很轻松的理解。就不详讲了。此处聊点其他的—子 View 的对齐方式哪里来的?从上面的代码中,可以看出,是从 View 的布局参数中取的,而 View 的布局参数是怎么来的呢?
要想了解布局参数怎么来的,我们就得首先了解下系统是怎么向一个 ViewGroup 中添加 View 的。我们知道,一个界面的布局,我们通常是在 xml 中设计的。而在所有的 ViewGroup 中,我们都可以加入子 View,并为子 View 加入约束。即 加入 View —> 加入约束的流程。此处加入约束的流程便是加入布局参数的流程。布局参数是子 View 告诉父 View 自己如何布局的途径。
让我们来看看加入 View 的流程,向 ViewGroup 中加入 View 是调用了 ViewGroup 的 addView 方法,addView 有好几个同名方法。我们来看看。
ViewGroup.addView
我们在 ViewGroup 的源码中搜索,会首先搜索到一个单参的 addView 方法。
// 很简单,点击进入双参的方法
public void addView(View child) {
    addView(child, -1);
}

public void addView(View child, int index) {
    // 待添加的 View 不能为空
    if (child == null) {
        throw new IllegalArgumentException("Cannot add a null child view to a ViewGroup");
    }
    // 获取布局参数
    LayoutParams params = child.getLayoutParams();
    if (params == null) {
        // 取布局参数为空,则生成默认的布局参数
        params = generateDefaultLayoutParams();
        if (params == null) {
            throw new IllegalArgumentException("generateDefaultLayoutParams() cannot return null");
        }
    }
    addView(child, index, params);
}
双参的方法,其实很简单。主要就是做了两个限制:
- 加入 ViewGroup 的 View 不能为空
- View 如果是无布局参数,会生成一个默认的。如果无法生成默认的布局参数,则会抛异常,无法加入 ViewGroup 中。
即待加入 ViewGroup 中的 View,不能为空,且布局参数不能为空。从上面的代码中,我们可以知道,加入约束,是在加入 View 的过程中便加入了。下面让我们来看看 ViewGroup 的 generateDefaultLayoutParams 方法。
protected LayoutParams generateDefaultLayoutParams() {
    return new LayoutParams(LayoutParams.WRAP_CONTENT, LayoutParams.WRAP_CONTENT);
}
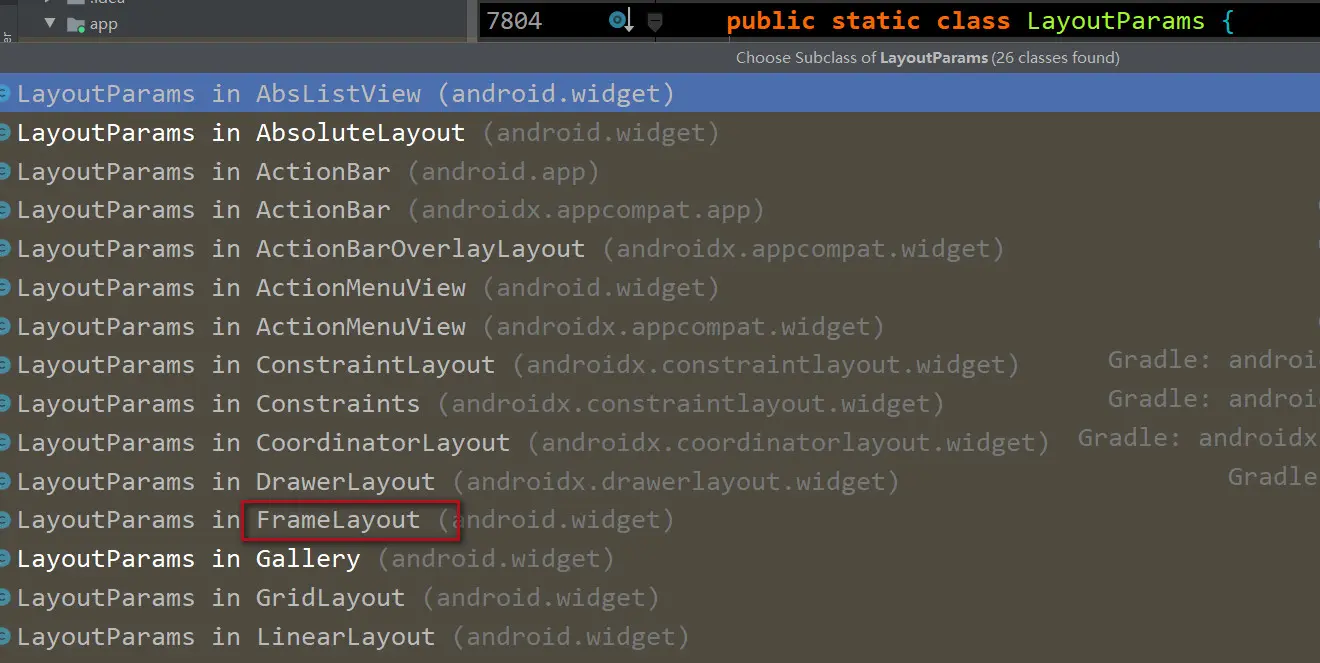
上面代码中的 LayoutParams 是何方神圣?其实 LayoutParams 是 ViewGroup 的一个公共内部类,它描述了 ViewGroup 的子 View 的尺寸(宽/高)。而它还有个子类:MarginLayoutParams。顾名思义,其是在 LayoutParams 加入了子 View 的 margin 描述。ViewGroup 中的子类就这两个了。也没有看到对齐方式的相关描述呀?不急,LayoutParams 旁边是有箭头的

点击箭头,我们找到了熟悉的身影—FrameLayout。让我们点击进去看看。
public static class LayoutParams extends MarginLayoutParams {

    public static final int UNSPECIFIED_GRAVITY = -1;

    @InspectableProperty(name = "layout_gravity",
                         valueType = InspectableProperty.ValueType.GRAVITY)
    public int gravity = UNSPECIFIED_GRAVITY;

    public LayoutParams(@NonNull Context c, @Nullable AttributeSet attrs) {
        super(c, attrs);

        final TypedArray a = c.obtainStyledAttributes(attrs, R.styleable.FrameLayout_Layout);
        gravity = a.getInt(R.styleable.FrameLayout_Layout_layout_gravity, UNSPECIFIED_GRAVITY);
        a.recycle();
    }

    public LayoutParams(int width, int height) {
        super(width, height);
    }

    public LayoutParams(int width, int height, int gravity) {
        super(width, height);
        this.gravity = gravity;
    }

    public LayoutParams(@NonNull ViewGroup.LayoutParams source) {
        super(source);
    }

    public LayoutParams(@NonNull ViewGroup.MarginLayoutParams source) {
        super(source);
    }
    // 此处的 LayoutParams 是FrameLayout 中的,不是 ViewGroup 中的
    public LayoutParams(@NonNull LayoutParams source) {
        super(source);

        this.gravity = source.gravity;
    }
}
上面便是 FrameLayout 中的 LayoutParams,我们发现其实际上是继承自 MarginLayoutParams 的。在 Margin 的基础上,增加了对齐方式的描述。实际上,每一个继承自 ViewGroup 的容器类,如果想要实现自己的布局规则,都必须照着这个模版,先在 LayoutParams 中定义自己的布局参数,再在 onLayout 方法中定义自己的规则。每个容器类都是照着这个模版来的。
可以看出,如何精进自己,最好的方式还是阅读源码。但是,阅读源码也要有条件。
- 你会用了。再去读源码,了解为什么要这样。否则就很容易事倍功半,效果奇差。
- 带着目的读源码,比如我这次,就是为了了解 View 的绘制流程,才找了很简单的两个官方实现:ImageView 和 FrameLayout。读了源码,一下子就明白了 measure 和 layout 在干什么,以及怎么干。
实际上,上面的 LayoutParam部分,已属于自定义 ViewGroup 的内容了。这里算是小试牛刀,抛砖引玉。下一讲,我们来讲讲如何自定义 View 和 ViewGroup。